Composting on your balcony is not only eco-friendly, but also budget-friendly and rewarding! If you think composting is difficult or will smell bad, this guide is for you. Today, we’ll explain 7 Easy Steps to Make a Smell-Free DIY Compost Bin for Your Balcony That’s 100% smell-free, mess-free, and beginner-friendly.
Why Every Balcony Needs a DIY Compost Bin
Balcony composting is a small-space miracle. You can turn your kitchen waste into nutrient-rich compost—without much space or effort.
This compost will serve as a natural fertiliser for your balcony plants, keeping them healthy and fast-growing. Bonus: No more throwing away kitchen scraps. You turn “waste” into “gold” for your plants!
What You’ll Need: Basic Materials for a DIY Compost Bin
The first step is simple—get some basic items ready:
- Container or Bin: A 15–20-litre plastic bucket or storage bin with a lid (an old paint bucket will also work).
- Drill or Sharp Nail: For making air holes.
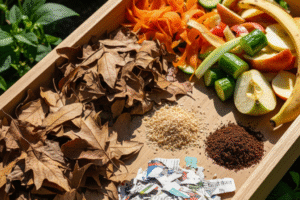
- Dry Waste (Browns): Dry leaves, paper scraps, cocoa peat, sawdust.
- Wet Waste (Greens): Vegetable peels, fruit scraps, coffee grounds, leftover greens.
- Compost Starter (optional): Old compost or curd (a little).
- Newspaper or Tray: To absorb excess moisture.
That’s all you need! Now, let’s start making compost step-by-step
7 Easy Steps to Make a Smell-Free DIY Compost Bin for Your Balcony
Step 1: Choose the Right Container

Choose a medium-sized bin with plenty of ventilation. If using a bucket, drill small holes in the lid and sides to allow for airflow.
Airflow will prevent odours and speed up composting.
Step 2: Create a Base Layer
Put a 2-inch dry layer in the bottom of the bin — from dry leaves, shredded newspaper or coco peat. This layer will absorb excess moisture and maintain airflow.
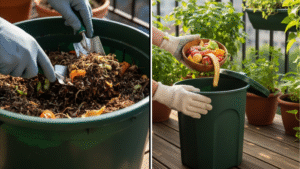
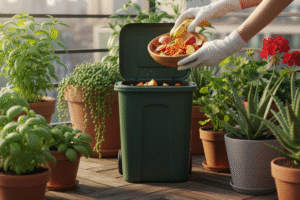
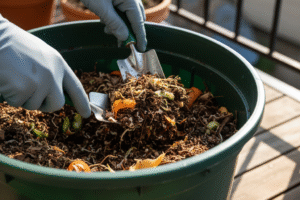
Step 3: Add Kitchen Waste (Green Layer)

Now add your kitchen waste — vegetable peels, fruit scraps, used tea leaves, eggshells. ⚠️ Avoid: Dairy, meat, oily food, citrus peel (these smell and attract pests).
Step 4: Add Dry Waste (Brown Layer)

After every green layer, be sure to add a brown layer—such as dry leaves, paper bits, or cocoa peat. This maintains the carbon balance and keeps the compost odour-free.
Step 5: Sprinkle Compost Starter
Add some old compost, buttermilk, or sour curd—this adds microorganisms that speed up decomposition.
Step 6: Maintain Moisture & Mix Weekly
Compost should remain slightly moist, but not soggy. 💧 Test: If a drop or two comes out when you squeeze the compost—perfect! Lightly mix the compost every 4–5 days.
Step 7: Let It Decompose (4–6 Weeks)
With proper layering and care, your compost will be ready in 4–6 weeks. The colour will be dark brown, and the smell will be earthy—that’s your “black gold”!
Tips to Keep Your Balcony Compost Bin Odour-Free
To avoid odours, follow these simple rules:
- No dairy or oily food waste — this promotes bacterial growth.
- Maintain airflow — Shake or mix the bin every week.
- Keep the brown layer high — Be sure to add as much brown as you do green lentils.
- Keep it shaded — direct sunlight can make the bin overheat.
-
You can sprinkle neem powder or baking soda if it smells.
Pro Tip: If the compost ever feels sticky, add extra dry leaves — the smell will instantly subside.
Best Composting Ratio: Green vs. Brown

Balance is the secret to odour-free compost! Use 3 parts brown + 1 part green. That is, for every 3 handfuls of dry material, add a handful of wet waste. This ratio balances both moisture and microbes.
What to Compost & What to Avoid
Compost these:
- Fruit & vegetable peels
- Tea bags, coffee grounds
- Eggshells
- Dry leaves, paper scraps
- Coconut fibre, sawdust
Avoid These:
- Dairy products
- meat or bones
- Oily or spicy food
- Citrus peel in large amounts
-
plastic or synthetic material
When Your Compost Is Ready – How to Use It
After 4–6 weeks, when the compost is dark brown and earthy-smelling, it’s ready!
How to use:
- Mix 1 part compost + 2 parts soil in balcony pots.
- For top dressing, add some compost every 20–25 days.
-
To store compost, keep it in an airtight container in a shaded area.
Result: Plants grow faster, leaves are greener, and flowers are more vibrant!
Benefits of DIY Balcony Composting
- 🌍 Eco-Friendly Lifestyle: The Best way to recycle kitchen waste.
- 💰 Money Saver: No need to buy expensive fertilisers.
- 🌱 Healthier Plants: Compost adds nutrients + good microbes.
- 🚫 Odour-Free Process: Right ratio = no bad smell.
-
Satisfying Hobby: Relaxing and fulfilling for every gardener.
Common Composting Mistakes (and How to Fix Them)
| Problem | Cause | Quick Fix |
|---|---|---|
| Compost smells bad | Too much wet waste | Add more dry leaves or shredded newspaper |
| Compost too dry | Not enough green waste or moisture | Sprinkle a little water or add fresh kitchen scraps |
| Attracts insects | Food is exposed | Cover with a brown layer (leaves, paper, or coco peat) |
| Compost not decomposing | Poor airflow | Stir or mix the compost every few days |
Related Balcony Gardening Guides
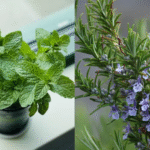
- How to Grow Roses on Your Balcony — Easy Steps for Beginners
-
How to Create a Vertical Herb Garden on Your Balcony This Winter
Conclusion: Start Composting, Start Growing!
Now you know 7 Easy Steps to Make a Smell-Free DIY Compost Bin for Your Balcony. With just a little effort and some kitchen waste, you can create rich, organic compost that will elevate your balcony garden to the next level. 🌿